|
|
Collimation of a Newtonian Reflector ... article still under construction, as of 16th July 2024 ... keep watching this space ... If you want to skip the preamble and go straight to the "how to do it" sections, click Collimation Cap, Cheshire, Concenter or Laser.
If you’re reading this, the chances are you’ve just got yourself a Newtonian reflector, and have realized perhaps belatedly that “Newts” come with a problem: they need “collimating”. Which is to say, the optical components need lining up. BY YOU. Yikes, you think. Collimation Definition: Alignment and coincidence of the principal axes of the telescope's optical components: namely the principal axis of the Primary Mirror, and the central axis of the eyepiece (or focuser). When you buy a refractor, the object most people imagine on hearing the word "telescope", you naturally and reasonably expect all its optical components (which are lenses) to have been professionally aligned in the factory before delivery, and that you’ll never to have to adjust anything for the lifetime of the scope. Imagine buying a telescope where you have to align all the lenses yourself. Unfortunately, when you buy a Newtonian reflector (with curved mirrors instead of lenses), that is exactly what you get: an assembly of components ostensibly in tne right place, but where the job of finely aligning everything is down to YOU. Also unfortunately, the image you'll see is highly sensitive to the correctness of the collimation. An out-of-collimation reflector yields horrid views. That Newtonians get supplied like this seems wrong: a marketplace aberration that shouldn’t be allowed. Like delivering you a car whose wheels and suspension you have to align and tune yourself. There are in fact good reasons for this. Big Newtonians are designed to be regularly dismantled and re-assembled, requiring a recollimation every time. Their mirrors are thick slabs of glass which change shape as the outside temperature changes at night. They sometimes need recollimation during an observing session! Luckily, collimating a Newtonian is not difficult, although it may seem so at first. There is no shortage of websites, books, articles and forums describing how to do it; nonetheless I feel there is room for another one. None of the descriptions I’ve read strikes the right balance, from the point of view of someone new to it, of what steps to do, why to do them, how important they are, and the consequences of not getting one or another quite right. In other words, which are crucial, and which don’t matter so much. Before getting into the collimation process itself, it’s worth first describing a Newtonian, and its various components.
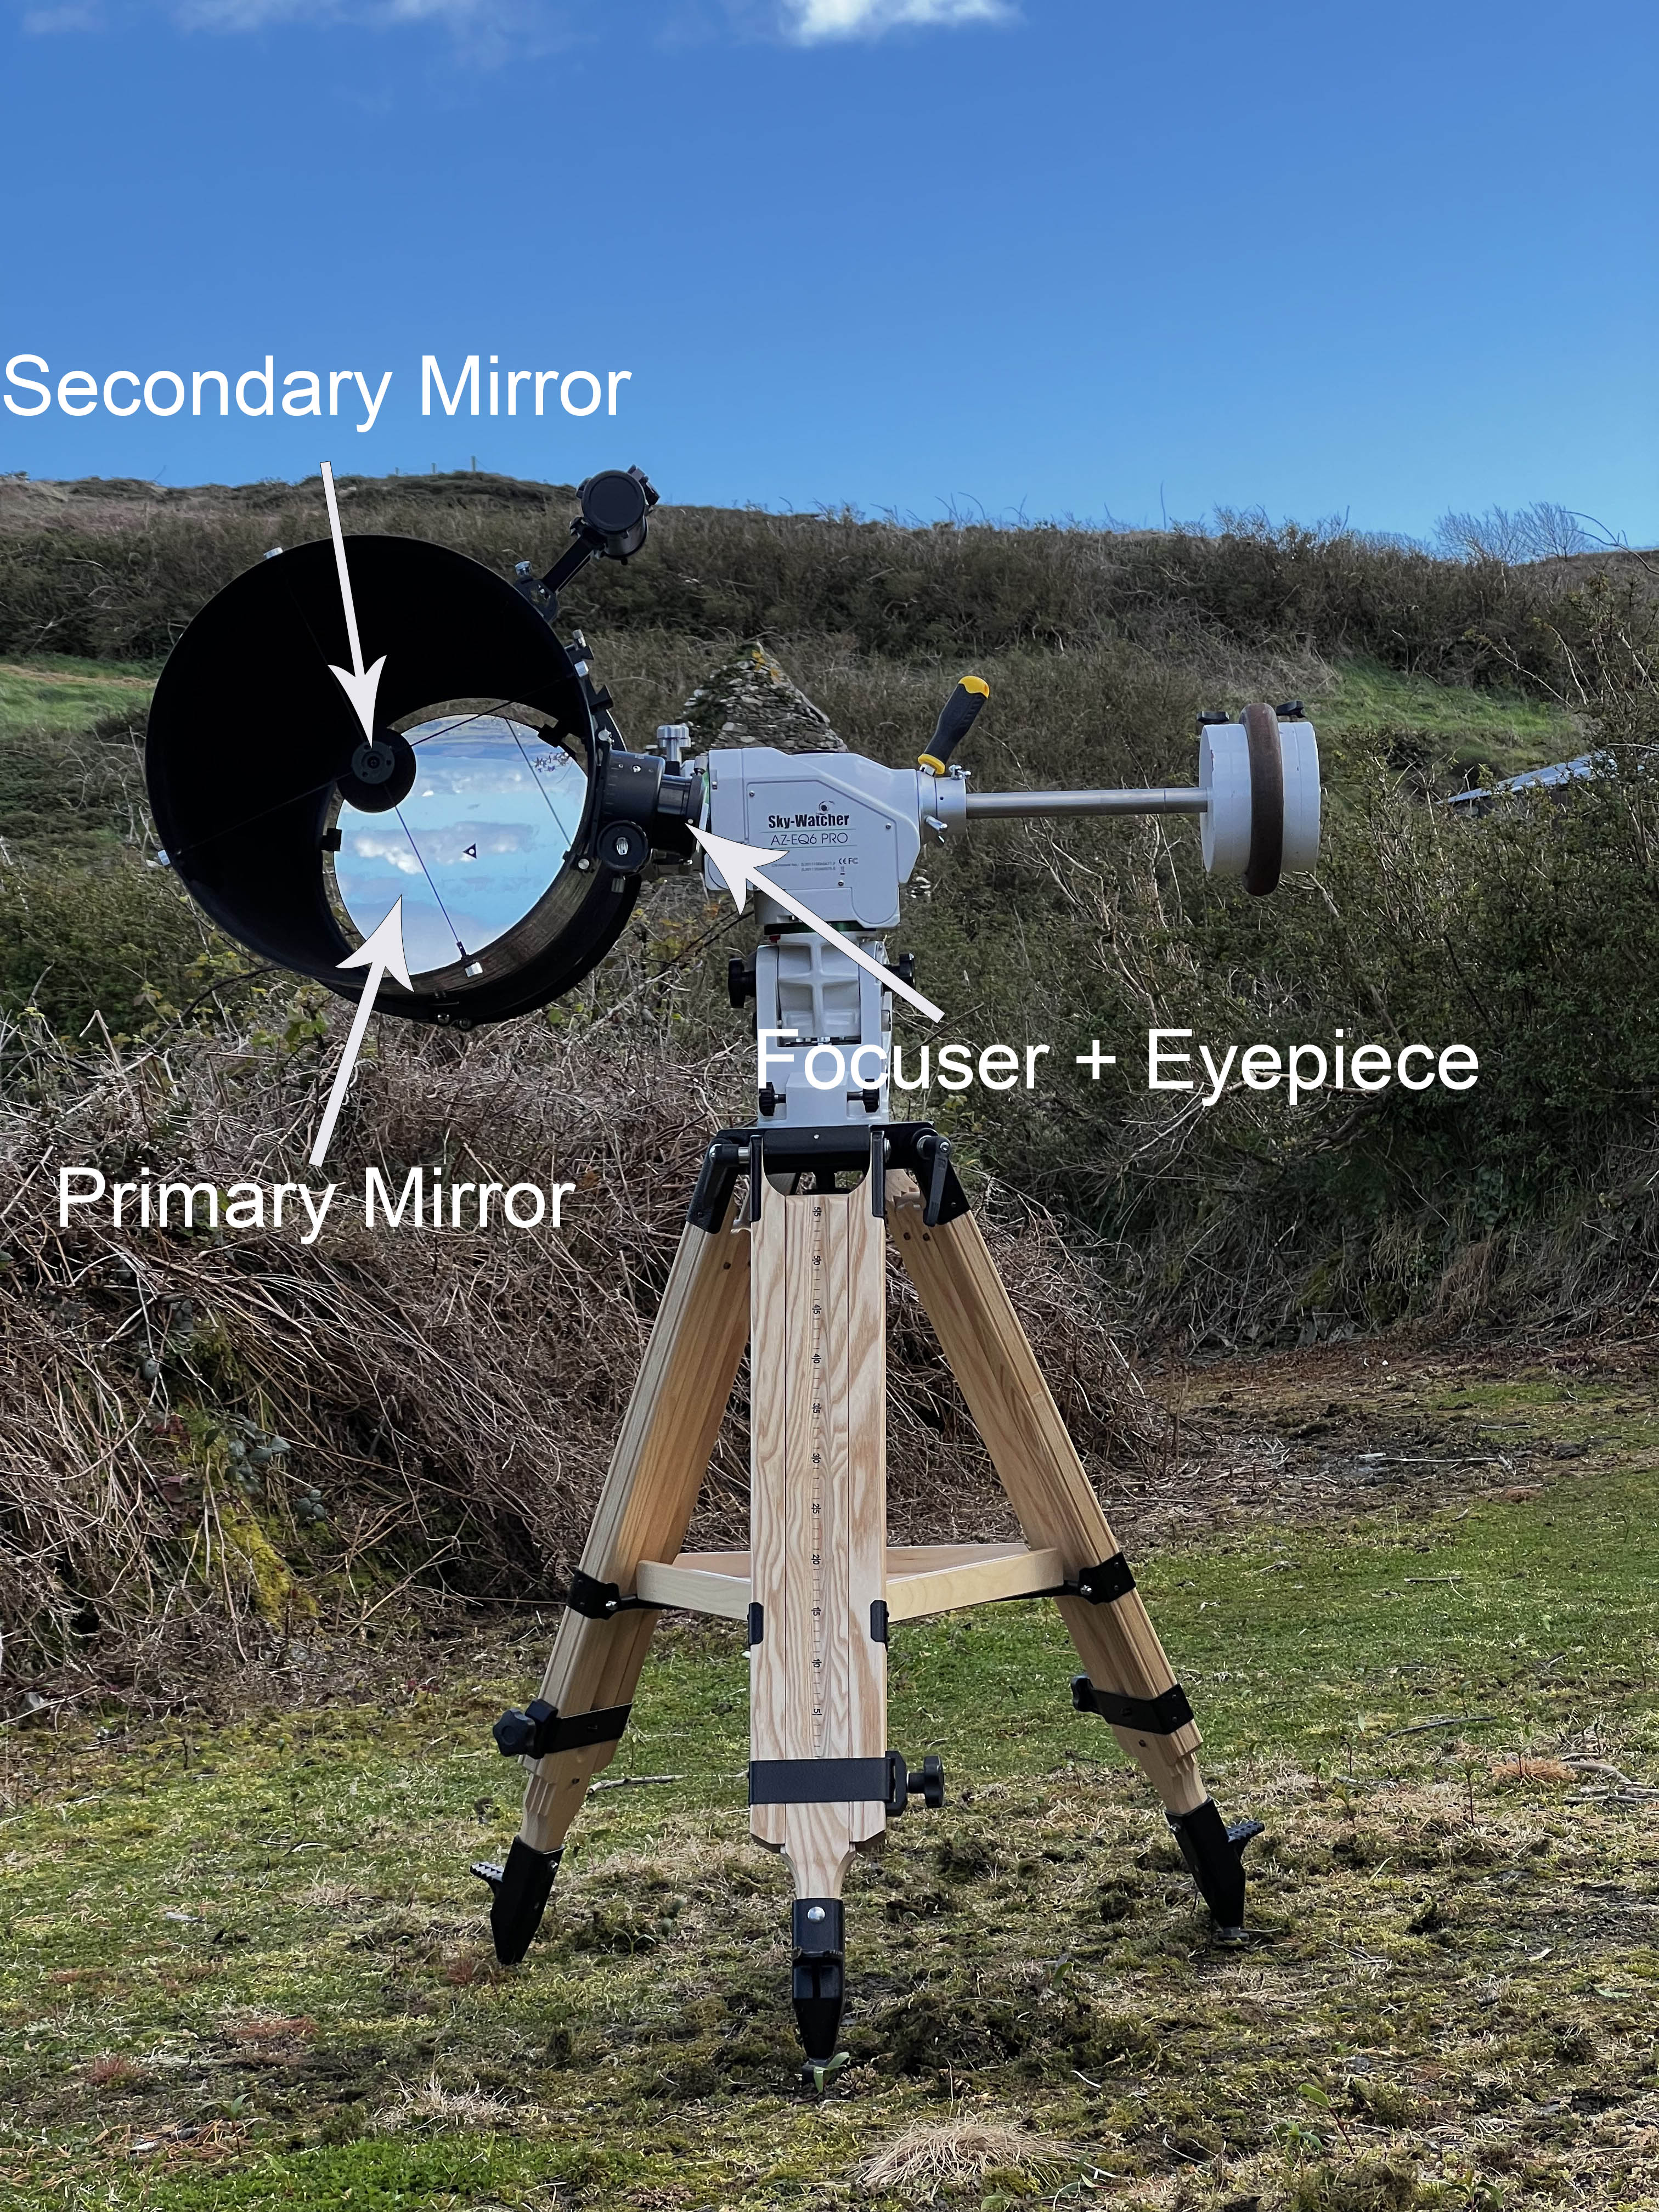
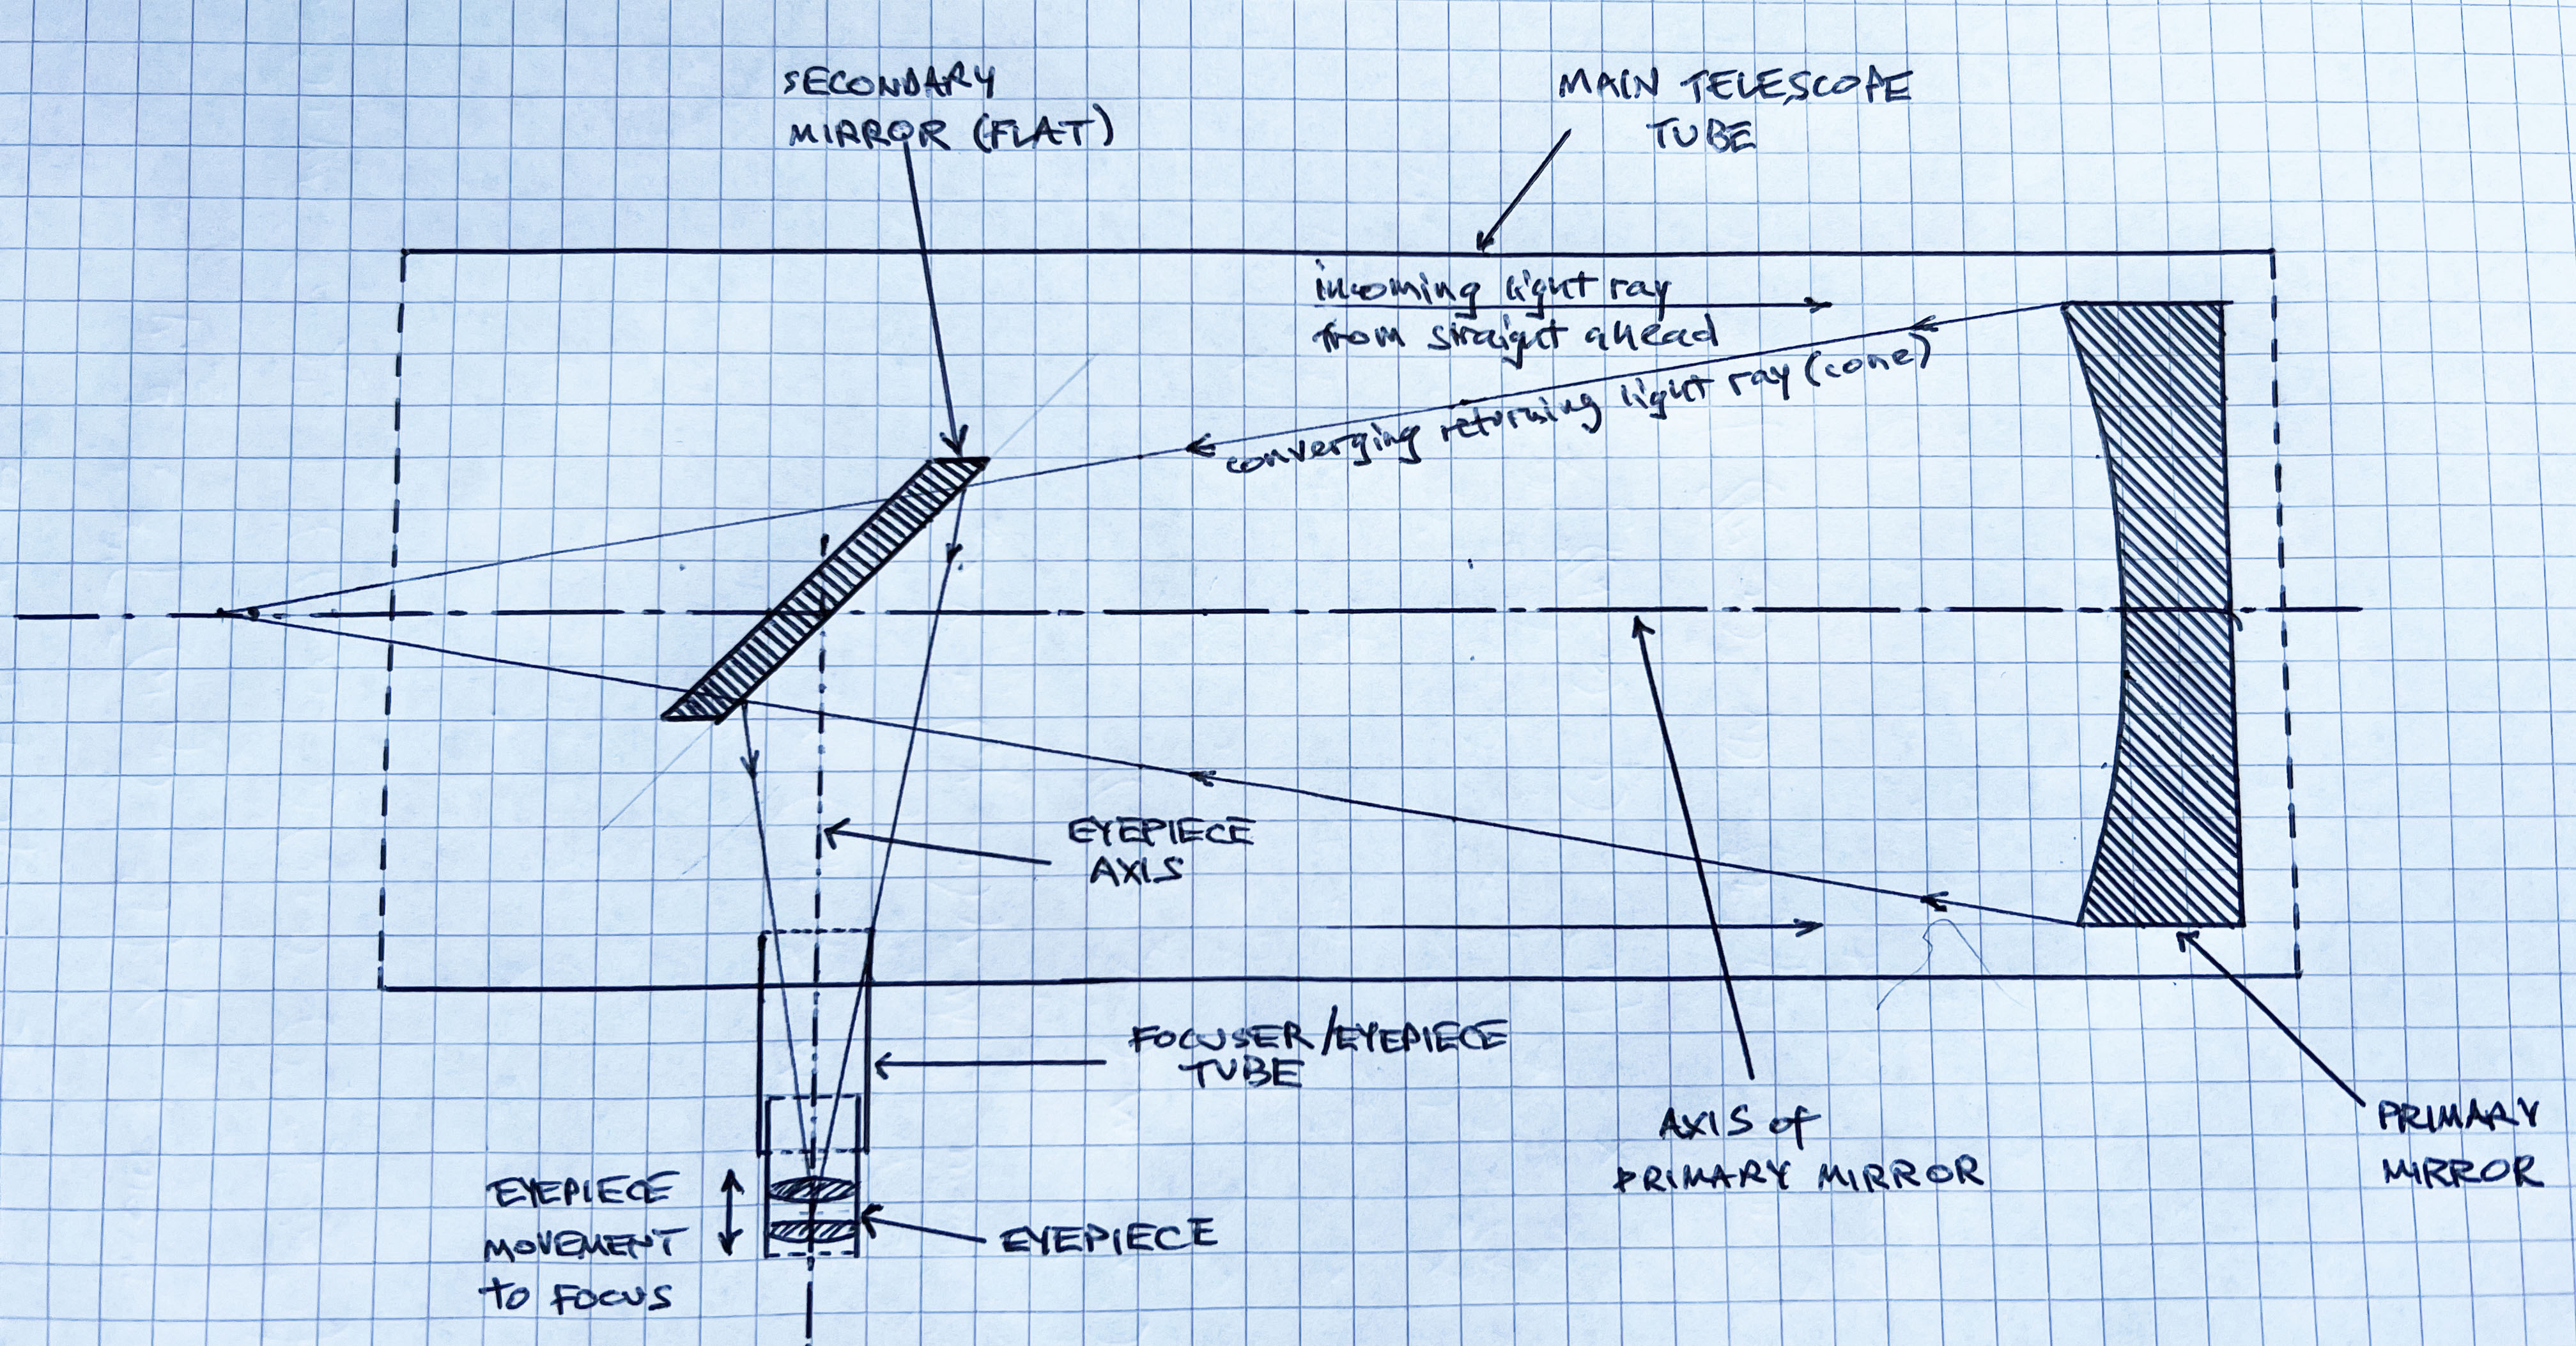
Whilst the familiar Refractor has a glass lens group at the front of its tube to divert and concentrate all the light from a particular faraway point striking any part of the frontal lens area back to a single point in the image, a Newtonian Reflector does the same using a concave mirror at the back of the main tube. The incoming light travels to the bottom of the tube and gets reflected as a converging cone, back the way it came, towards a focal point somewhere ahead of the main tube entrance. But before it gets to the focal point, that cone gets reflected sideways by a small central flat oval mirror (the Secondary Mirror or "Flat"), to converge instead outside the tube, there creating the image to be viewed by an eyepiece or a camera. This sideways-diversion allows your head to not be in the way of the incoming light when you look at the image with an eyepiece placed in the Focuser, at the cost of a small obstruction in the way of the primary mirror caused by the secondary mirror (a much smaller obstruction than your head!). Thus, a Newtonian comprises a big main mirror called the “Primary Mirror”; a “Secondary Mirror”: a smaller, flat, elliptical (oval-shaped) mirror angled at 45 degrees (usually) and suspended on a “Spider” near the open end of the tube. Level with where the oval Secondary Mirror sits, there is a hole in the side of the main tube for the “Focuser”, which is a more or less elaborate adjustable-length narrow tube into which the “Eyepiece” gets inserted. The secondary mirror is elliptical because when viewed from a 45-degree angle, from either the eyepiece or the primary mirror, perspective ensures that it appears to be circular. The Primary Mirror has an “optical axis”, which can be imagined as an invisible line rising perfectly vertically out of the exact centre of the mirror. This mirror sits on an adjustable frame (the “Primary Cell”) which allows it, and therefore its optical axis, to be tilted a few degrees in any direction using three knobs or screws, usually behind the mirror cell. The Eyepiece-and-Focuser tube also has an optical axis, running down its exact centre. Because the Eyepiece tube is locally fixed in orientation, its axis cannot be directly moved around. However, the tilt of the flat Secondary Mirror is adjustable, via three grub-screws visible at the front of the scope, so the reflected eyepiece axis CAN be moved around to effectively point at wherever is required at the bottom of the main tube. And this is how the secondary mirror gets collimated.
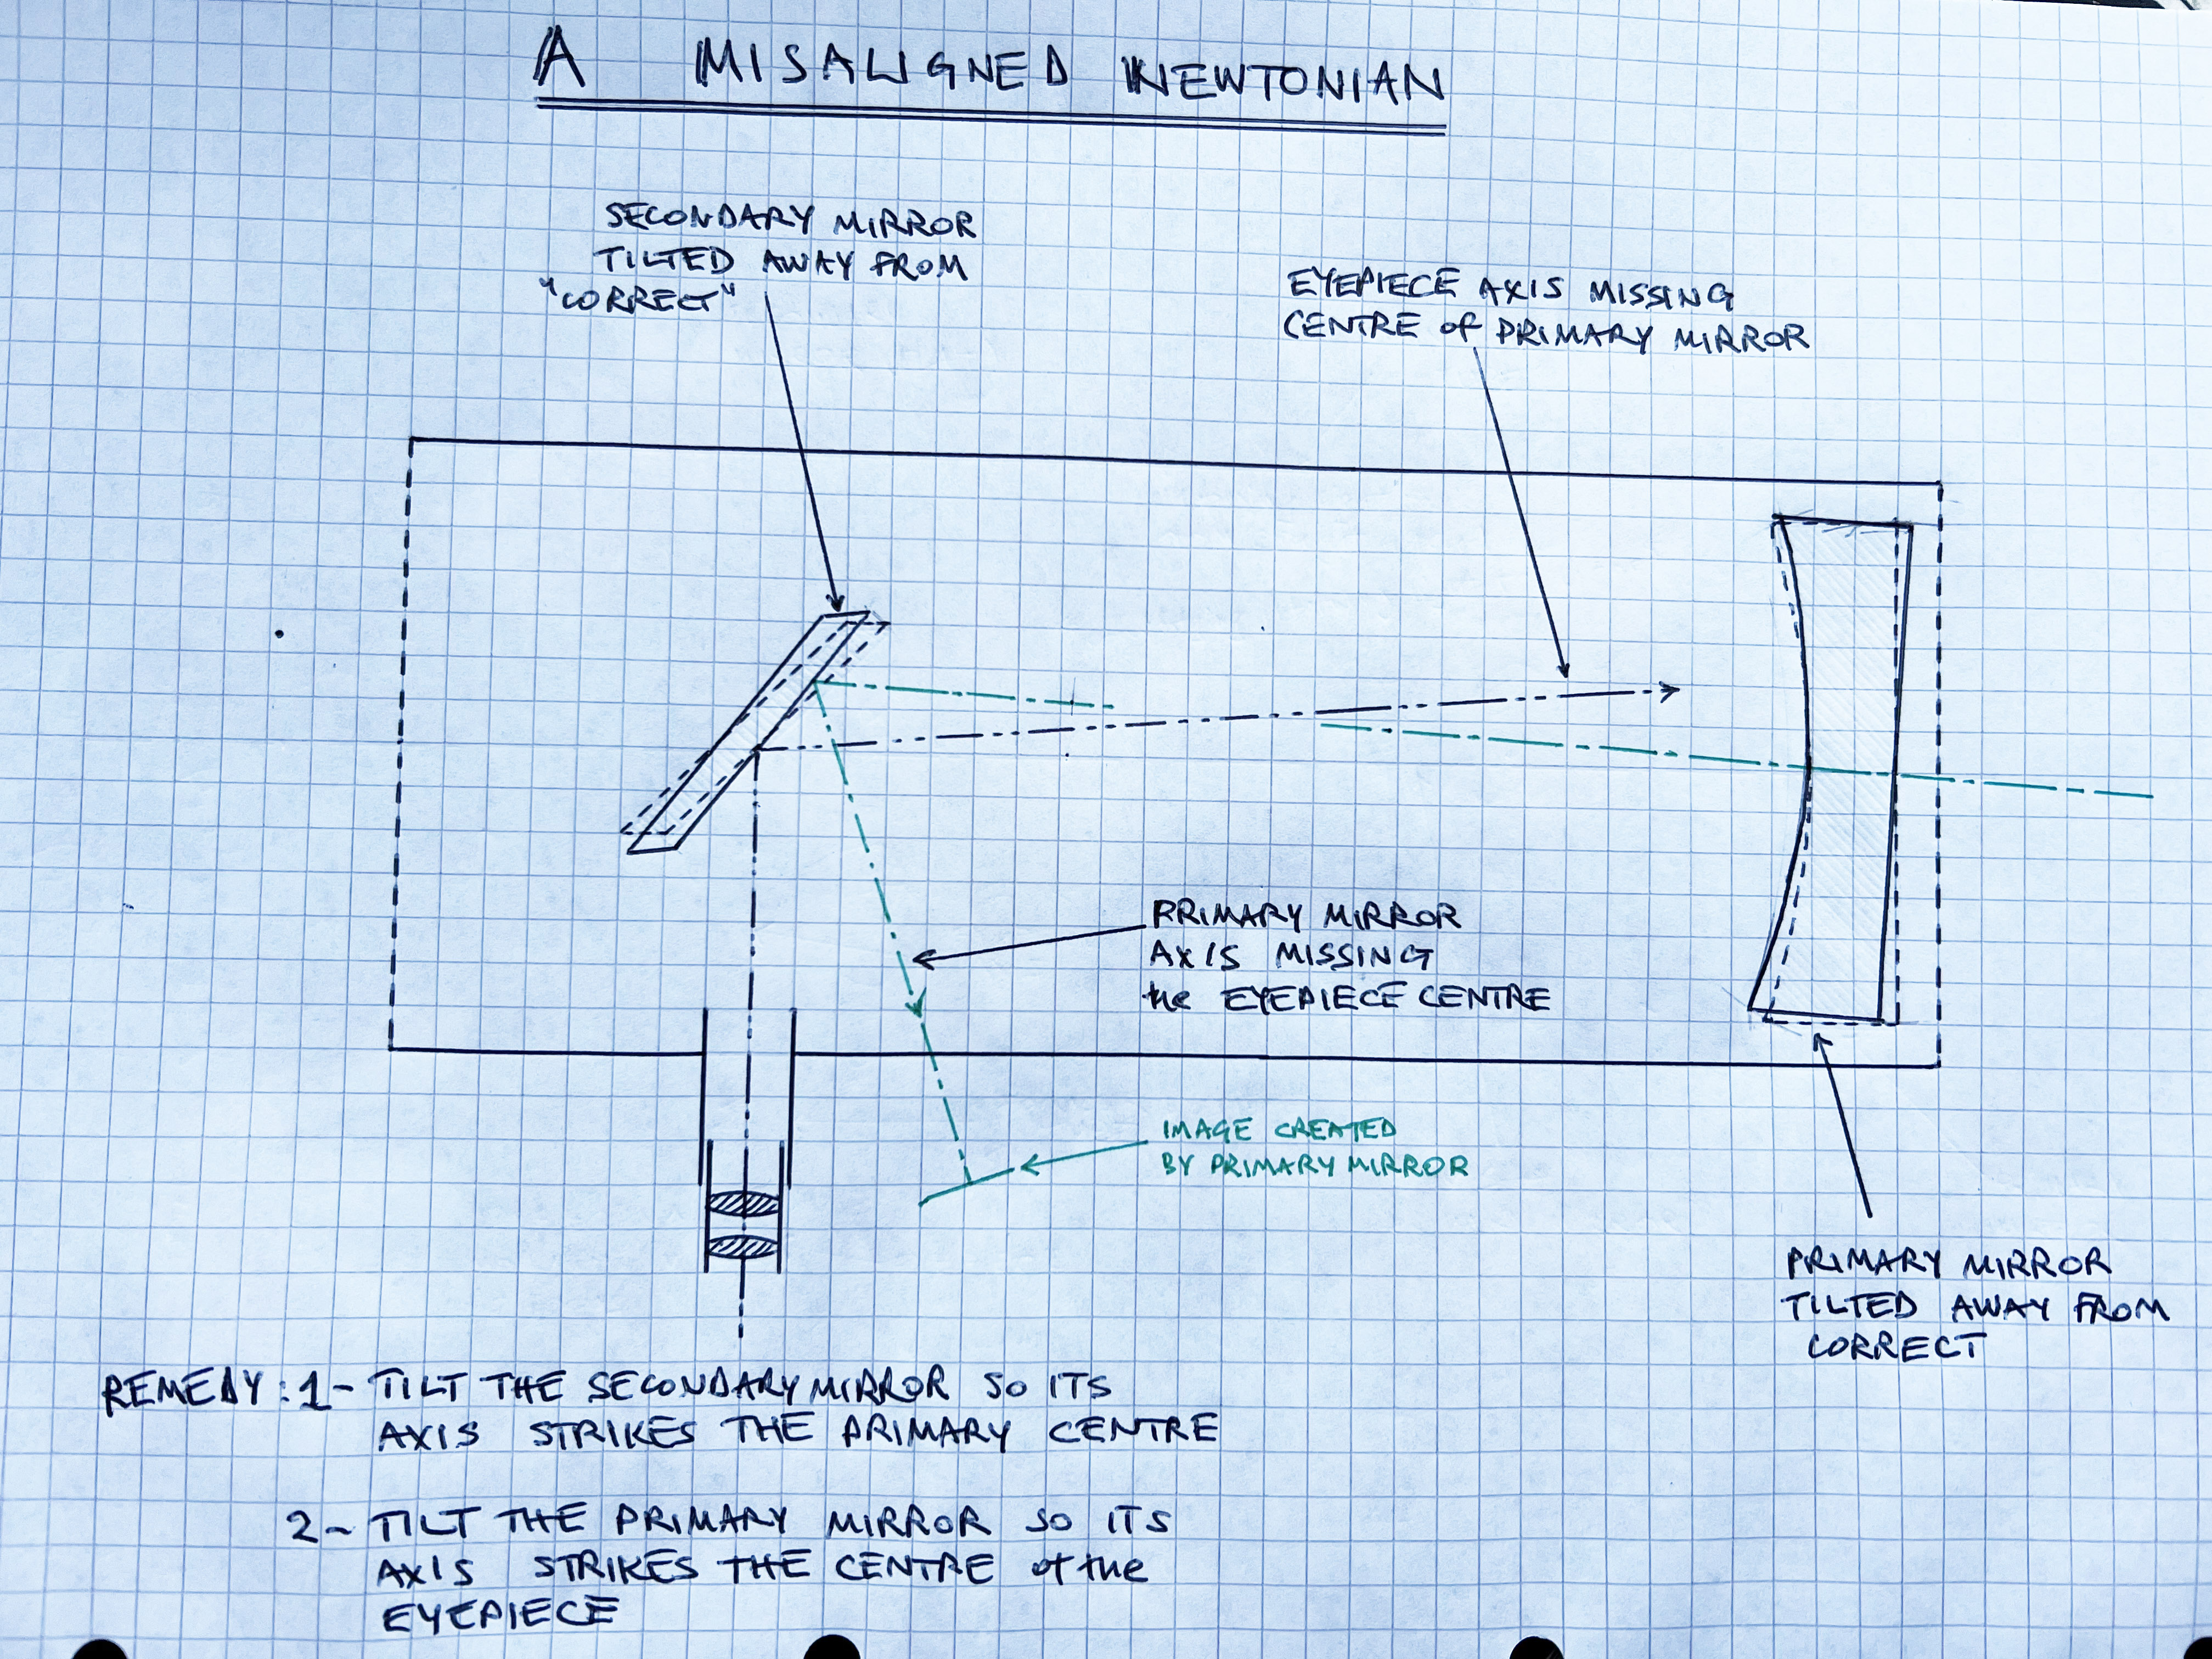
As stated above, “Collimation” is defined as “aligning/making-coincident the axis of the eyepiece with the axis of the primary mirror”. The eyepiece axis can be thought of as pointing “in and down” to the centre of the Primary Mirror. And the Primary Mirror axis can be thought of as pointing “up and out” away from the centre of the primary, to the centre of the eyepiece. One simply has to adjust the tilt of the secondary to point the eyepiece axis at the centre of the primary, then adjust the Primary Cell’s knobs to point the primary’s axis back up to the centreline of the eyepiece. To summarize, collimation of a Newtonian comprises 2 tasks, with a preliminary one: TASKS/STEPS 0: Preliminary: Place the secondary mirror "astride" the converging light-cone and level with the focuser (see diagram above), to bounce the cone out sideways into the eyepiece tube; 1: Align the Focuser Axis to the Primary: Aim the centreline of the eyepiece tube at the centre of the primary mirror, by tilting the secondary; 2: Align the Primary Axis to the Focuser: Aim the vertical axis of the primary mirror back to the centre of the eyepiece tube, by adjusting the primary cell’s knobs. Relative importances: <2> is crucial to get as correct as you possibly can. <1> is also important, but more tolerant of small error. <0> is, by far, least important. Personally I don’t even count step 0 as “collimation” at all, merely a preparatory step. Getting this “wrong” merely excludes a bit of light from reaching the eyepiece: a Newtonian can be properly collimated and still have a badly-positioned secondary. Ease of action: <2> is extremely easy. <1> is also easy enough. <0> can be extremely frustrating to achieve “perfection”, but need only be roughly visually “correct”, and there are anyway different definitions of what constitutes “correct”. To summarize:
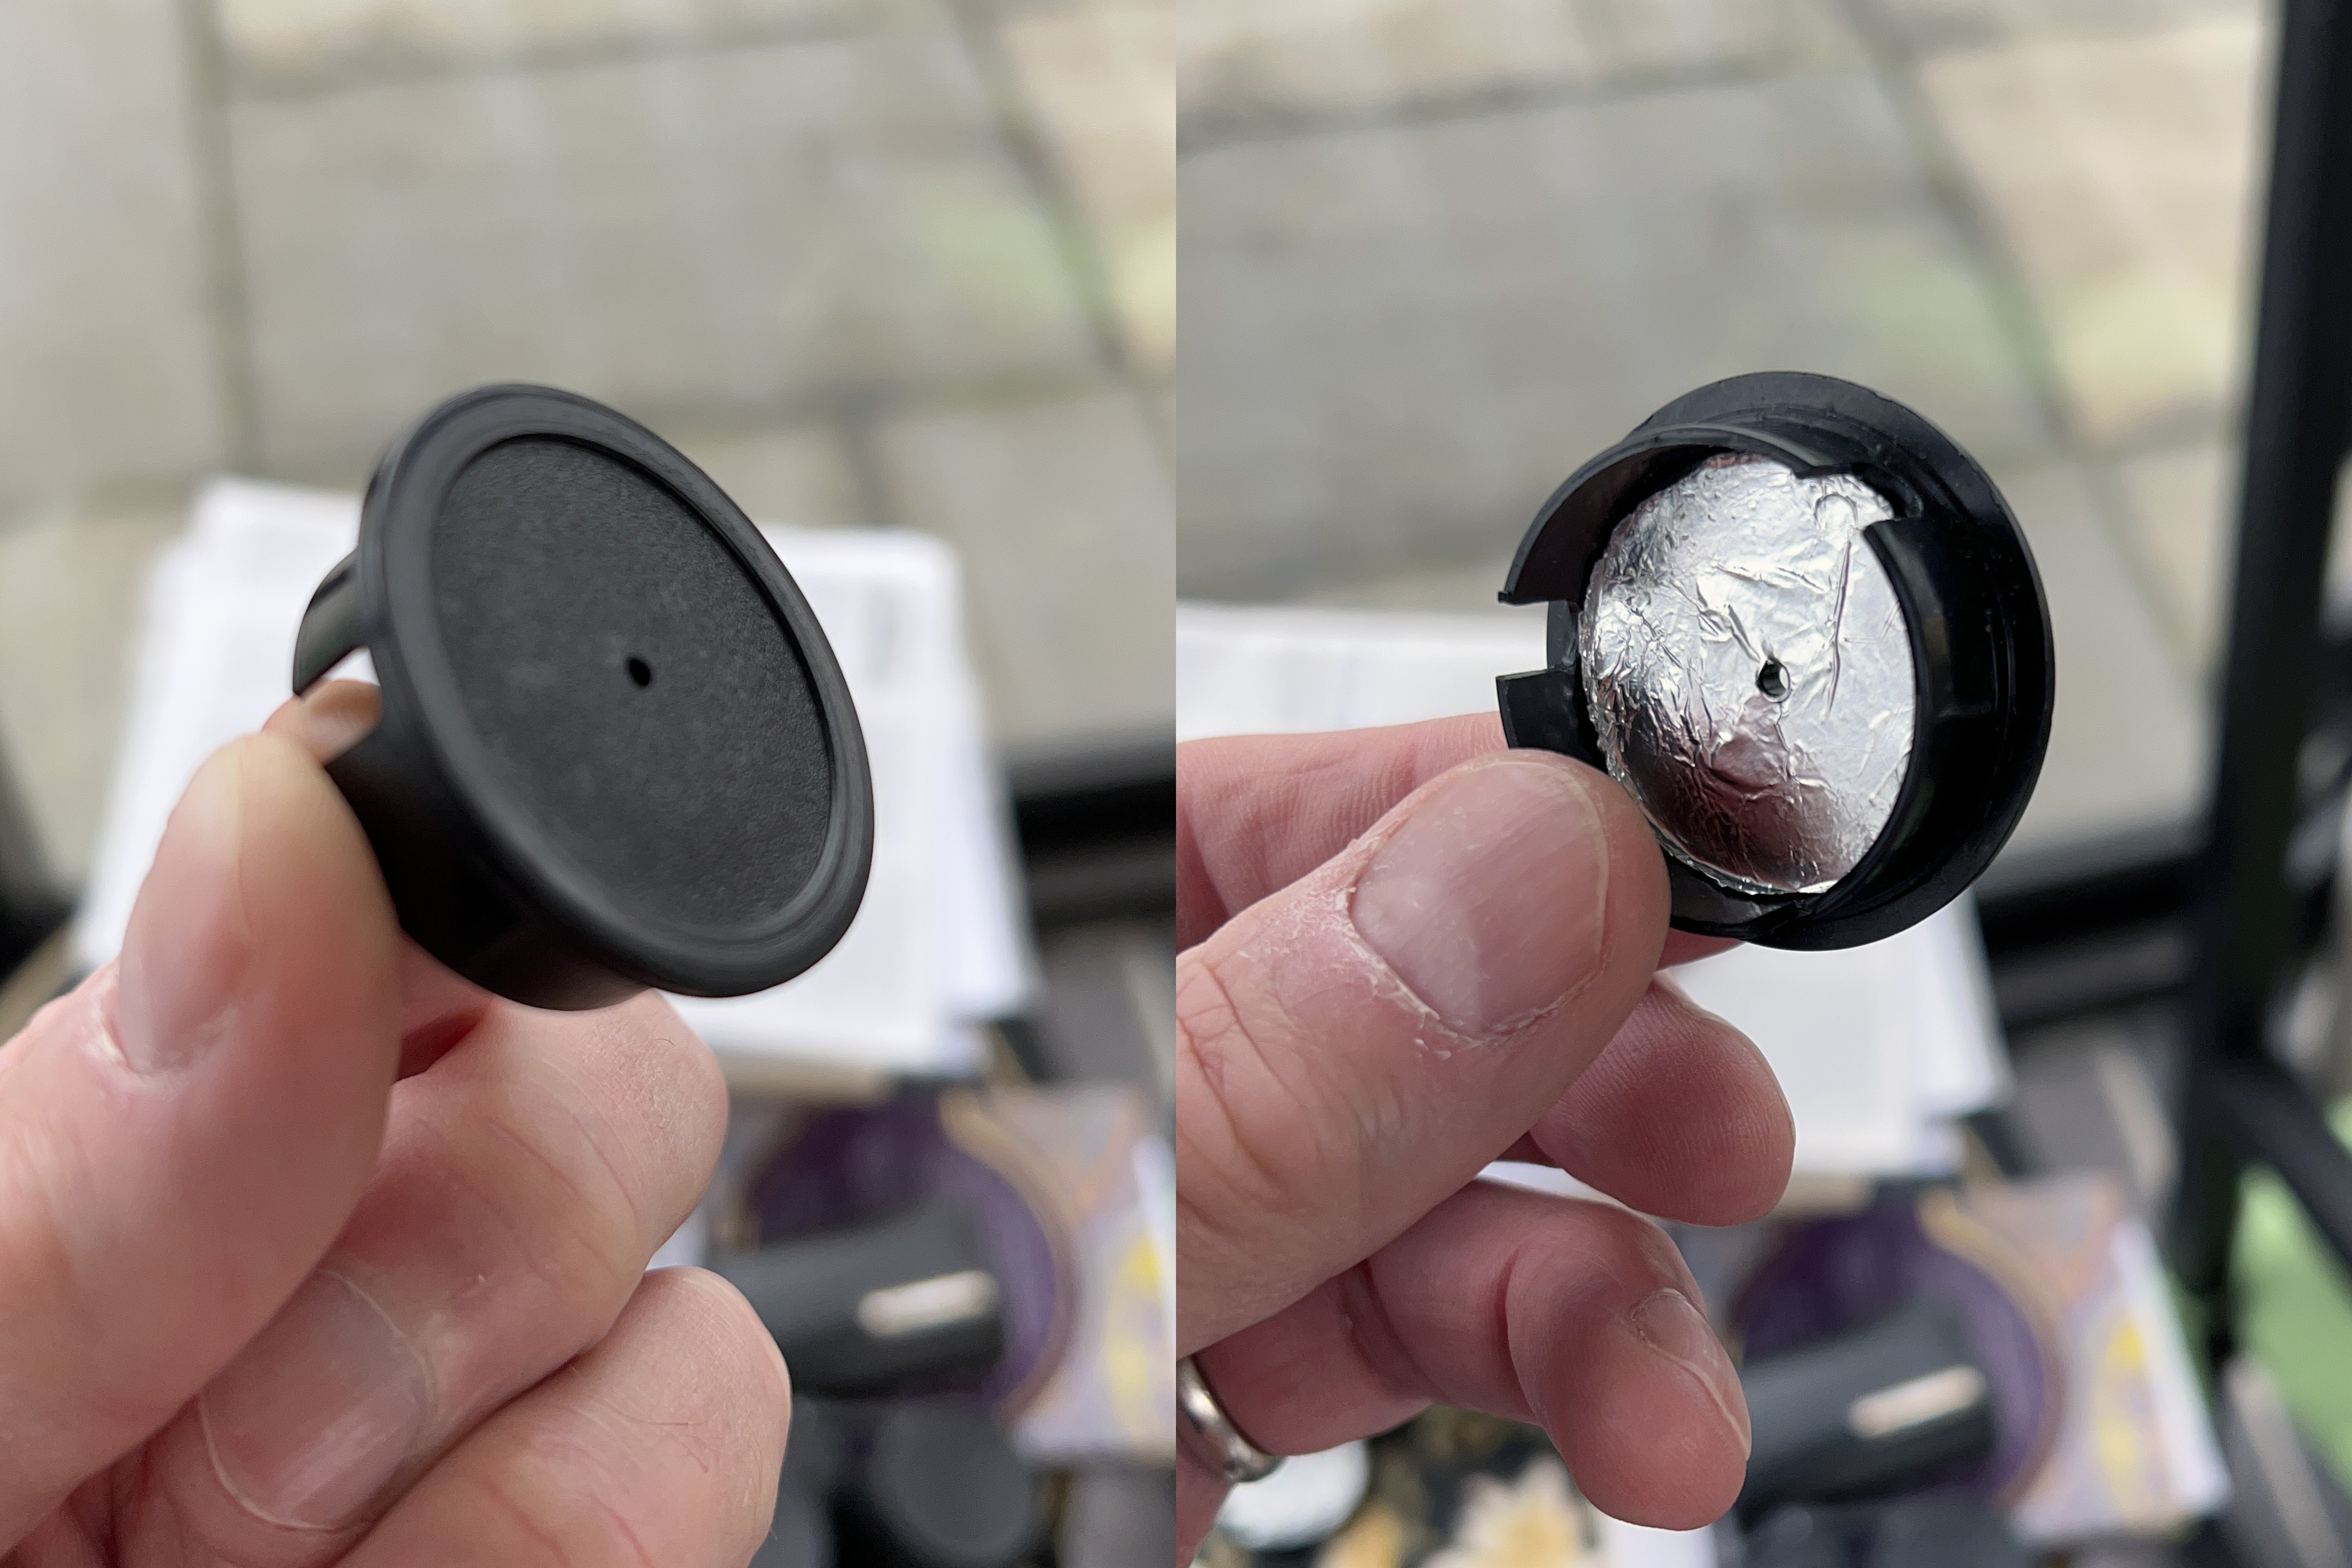
* ...but not recommended - see below for shortcomings of using a laser to collimate HOW TO DO IT TOOLS You will need one or more tools to perform collimation. I’ll describe how to collimate using each tool. They include: Collimation Cap (for step 2, and very roughly doing step 0 & 1)
Sight Tube (for step 0) A sight tube is Concenter (for step 0, 1) A Concenter is Cheshire Eyepiece (all steps)
Concenter (for steps 0 and 1 and possibly step 2) A Concenter is essentially a Cheshire with the crosshairs replaced by a series of concentric circles etched on a glass pane with a central hole. The circles allow you to better judge the "circularity" of the secondary (step 0). The central hole in the glass pane shows where the eyepiece is pointing (step 1). If you can make out the reflection (in the primary) of any part of the Concenter, you can collimate the primary too, but it may not be bright enough to be possible. Laser Collimator (for steps 1 and 2 – but beware!) A Laser Collimator is a tube that fits into the focuser and emits a laser-beam along its axis, to hit the primary mirror (step 1). The beam gets reflected back towards the eyepiece and its return-dot can be seen on the face of the laser (step 2). However, unless you're prepared to spend a lot on the laser, it will itself very likely not be collimated (i.e. the beam is not parallel to the laser). Using such a laser guarantees mis-collimation of both steps. i.e. spend money, or use a Cheshire. Others, for example auto-collimator, Barlowed laser, camera-based methods or star testing I will not describe at this basic level, as you’re only likely to use these once you’re fully au fait with the whole process. But I shall describe them below in some :"extra interest" paragraphs. For a starter-out, I strongly recommend the Cheshire, though I appreciate that many will be unable to resist the apparent ease and simplicity of a laser. However, I repeat that many/most lasers you'll buy as a beginner will guarantee mis-collimation due to the lasers themselves being mis-collimated. Prelim (step 0): Placing of the Secondary Mirror The Secondary Mirror, slanted at approximately 45 degrees to the tube, is attached to a "boss" (itself attached to the main tube via 4 - sometimes 3 and rarely, just 1 - so-called spider-vanes) via a central sprung threaded screw, plus three grubscrews. The central screw moves the boss+mirror up and down the main tube. The three grub screws finely alter the mirror's tilt. To move the whole mirror up or down the tube, you must first unscrew the three grubs. - pic of secondary assembly - The intention here is to place this mirror such that its outline looks more-or-less circular and concentric when viewed through a pinhole at the eyepiece position. The tricky part is to actually determine where the outline is, against all the other reflected circular outlines. Whatever tool you use for this step, you will be looking through a pinhole, on the eyepiece axis and at roughly the position of the focal plane. It's a confusing mass of reflections, dark and light discs, and criss-crosses, some out of focus. You're only looking, at this stage, for the outline of the edge of the secondary mirror against the opposite wall of the main tube. To reduce the confusion of the reflections, it helps enormously to block them off. To do this, take 2 sheets of paper, of different shades. Tape one sheet "down the tube" from the secondary mirror to block off the primary. Attach the other sheet to the main tube wall, opposite the focuser. You'll be reaching down through the spider-vanes, so remove any jewellery, bracelets or watches to avoid catching anything. - diagram of paper sheets - Collimate Using a Cheshire Eyepiece Place the Cheshire in the eyepiece holder, pinhole facing out. Look through the pinhole. You'll see something not unlike this:
First, I'll describe what all the things you can see actually are. See also the annotations in the "collimated picture" later on. - The "hazy cross" is the pair of cross-hairs at the end of the Cheshire Eyepiece tube. Hazy because they're out of focus, being quite close to your eye, whereas you're likely focused on the primary mirror and beyond. However, the hazy cross is very important: the first step in collimation-proper is aligning these hazy crosshairs to the primary mirror's centre spot. These cross-hairs are seen in direct vision (albeit out of focus), as opposed to being a reflection. - In the picture you can see a small black triangle with a smaller hole in its centre (in your scope, it may well be a white donut). This is the centre-spot of the primary mirror, reflected once in the secondary. It's also very important: it's the aiming-point for the hazy cross-hairs to collimate the focus-tube (using the three secondary adjustment screws at the front of the telescope). - Within the dark central circle is a smaller white disc, with a black dot in its centre and a cross (your Cheshire may not have a cross). That is a reflection of the angled side-face of your Cheshire Eyepiece via the secondary to the primary and back to your eye via the secondary again. Put your finger in the side-opening of the Cheshire to check. It's the most important reflection. You'll "move" it to the black triangle (or white doughnut) by turning the primary mirror adjusters. The tiny dark dot in its centre is the pinhole you are looking through! - There's a large much sharper pair of cross-lines. These are a reflection (in the primary via the secondary) of the spider-vanes supporting the secondary mirror at the open end of the telescope. They are to be ignored for collimation purposes. - The black disc offset from centre with the brighter disc within it is a reflection of the silhouette of the secondary mirror. Again, ignore this. When collimation is complete, this dark disc will be noticeably offset from concentric. - the large all-encompassing white circle is a reflection of the view of the open end of the telescope. What you're trying to achieve is the picture below, where the primary mirror centre-mark, the small bright central disc and the hazy cross-hairs all coincide:
The process is ilustrated in the image below: pic: uncollimated => secondary tilt adjusted for focus-tube collimation => primary tilt adjusted for primary collimation ~ ~ ~ Concenter ... article still under construction, as of 16th July 2024 ... watch this space ... | ||||||||||||||||||||||||||||||||||||||||||||||||||||||||
|
email: [email protected] | tel/WhatsApp: 089 613 0361
|